|
|

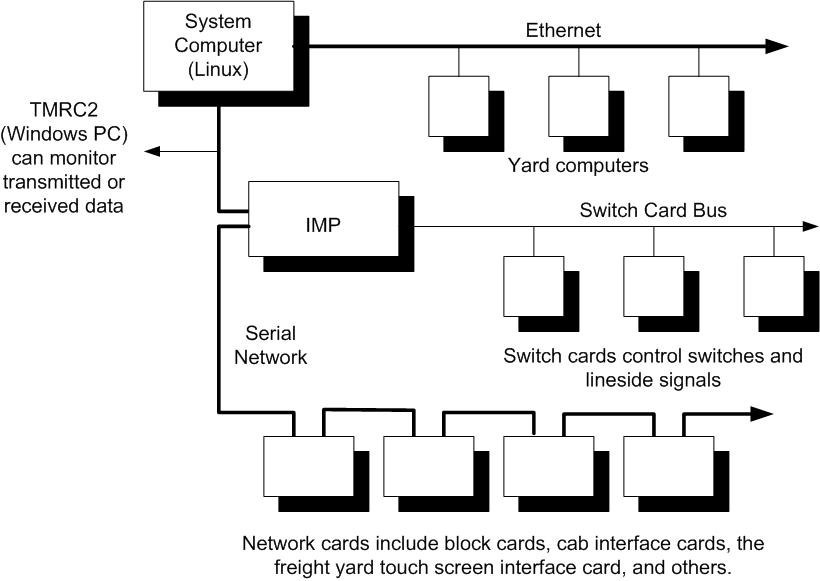
The figure above is a block diagram of System3. The various elements have the following functions:
The System Computer runs the System3 server software, which is invoked by clicking on the Run Sys3 icon. The server controls the setting of switches and the powering of blocks by communicating with the Interface Message Processor (the IMP). The System Computer also runs the SCab display program that provides a graphical user interface invoked by clicking (only once!) on the SCab icon. Although not part of System3, the TMRC2 Windows PC can monitor network traffic for debugging purposes via the Pic_test program. It also can access files on the System Computer ("Drive Y") via the Ethernet.
The IMP is a very specialized network card/device that performs two very important functions:
The Switch Card Bus protocol and electrical characteristics are discussed at http://tmrc.mit.edu/sys3/switchcard. The Switch Cards control the status of all track switches and lineside signals.
The Network Cards are of several types:
Further information about the Switch Card Bus, Switch Cards, and various types of Network Cards can be found at http://tmrc.mit.edu/sys3. Many of the applicable web pages are also included in the "Web Info" section at the back of this binder.
When debugging System3 problems, there are many occasions when one needs to know the topology of the System3 network. This information is available from three sources:
This listing has the advantage of describing the network bus addresses in physical order, starting with the card nearest the IMP. Further, it tells the card type and the card location. However, while this list should be up-to-date, it may not be. Network cards may have been added or removed.
This program uses a switch behind the System Computer. The switch should be in the UP position.
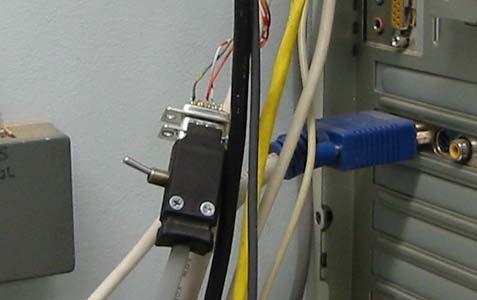
With the switch in the UP position, this program displays the addresses of the network cards that are responding to the IMP. It does not say anything about the card types or locations, although the locations are generally in physical order, starting at the IMP, in the same fashion as SYS 3 Bus addresses. If all network cards are present and working, Pic_Test and SYS 3 Bus addresses should display the same card addresses.
If the Pic_Test list is shorter than the SYS 3 Bus addresses list, there is a problem with the last card shown on Pic_Test, or the connection between that card and the next card, or the next card.
The Pic_Test program displays the card addresses in small boxes. If you click on an address box, the box's outline turns red and the data being sent onto the network by that card scrolls up the screen. An example entry would be:
FF 01 07 08 FF 26 00 FF FF FF FF FF 34 272
Where FF is start-of-packet, 01 is an OP code, 07 is the address you selected, 08 is the number data bytes that follow, FF 26 00 FF FF FF FF FF is the data, 34 is the checksum, and 272 is a running tally of the packets received.
When the switch is in the DOWN position, this program displays the addresses the computer is sending to the network cards, i.e. what cards it is trying to talk to. Further information is beyond the scope of this document.
(A real-time listing of activity shown on the System Computer screen)
When the System3 program starts running on the System Computer, a sequence of commands will appear as the program communicates with the IMP and the various cards on the network. While this has the advantage of telling you what is really happening on a real-time basis, it is a bit difficult to interpret.
On the System Computer, (TMRC), you can find C:\Home\TMRC\Sys3 development\SYS3 Bus Addresses. It looks like this, but this is just a sample of what it looks like. This is not the updated list.
TMRC System 3 Bus addresses
Note: cards are listed in order of distance from the IMP Addresses are not significant in card location.
Number Card Type (numeric) Card type Location 0 1 IMP Under tower 99 4 Turntable Engine yard 240 3 Cab driver F yard, east end 7 2 Block card Helix 8 2 Block card Helix 9 2 Block card Helix 135 5 B'ville control panel Berkmannville 241 3 Cab driver Berkmannville 11 2 Block card Under staging 12 2 Block card Under staging 242 3 Cab driver Foot of tower 3 2 Block card Cable storage area 243 3 Cab driver Oil plant 2 2 Block card Cable storage area 4 2 Block card Cable storage area 5 2 Block card Cable storage area 17 2 Block card Under roundhouse 1 2 Block card Under roundhouse 9 2 Block card Under roundhouse 10 2 Block card Under roundhouse 102 8 F yard controller F yard, west end 13 2 Block card Under F yard (left) 14 2 Block card Under F yard (left) 15 2 Block card Under F yard (left) 16 2 Block card Under F yard (left) 19 2 Block card Under F yard (2nd cabinet) 244 3 Cab driver Middle Heights 245 3 Cab driver F yard, west end
Once you have identified a suspect card, the first thing to do is to confirm that this is the correct suspect card.
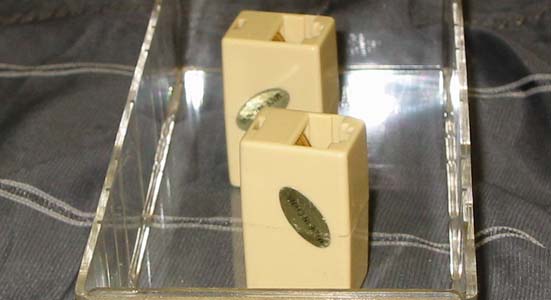
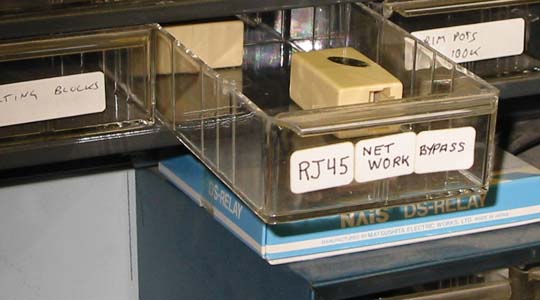
First, and most obvious, confirm that the suspect card is getting power. If not, jiggle the power connectors. If that doesn't help, check the four power lights at the top edge of the tower nearest the System Computer and Windows PC. If any of these is out, cycle the system power off and on to reset the circuit protectors within the power supplies. Also check the manual circuit breakers under the tower to ensure that none of these has tripped.
If the suspect card is apparently getting power, reconnect it to the network and jiggle the network connectors. Restart Sys3 and see if this solves the problem.
If the problem affects only one block on the card, there is a possibility that the connection of the track feeders for that block has become loose. Check this.
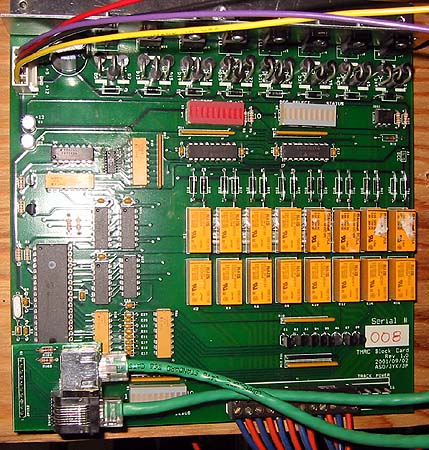
Each block card serves eight blocks. The throttles for those eight blocks are mounted on a heat sink along one side of the card. At the end of the card nearest the throttles is a connector for the voltages used on the card. On older cards, the voltages are:
There are two sets of LEDs near the throttles. The red ones are labeled “Reverse” on the board. When lit, each indicates that the corresponding reverse relay is operated; the train is westbound. Two LEDs near the end of the package are labeled “+5” and “+12.” When lit, they indicate that the block card is receiving those voltages.
The green LEDs are labeled “DCC Select.” When lit, each indicates that the corresponding DCC selection relay has been operated; that block is connected to the (as yet unimplemented) DCC bus. The end-most LED is labeled “Status” and is the “heartbeat” LED. When lit, it indicates that the on-board processor is running.
In one corner of the board there are two RJ45 connectors, one black and one silver. (On older boards these are mounted on an auxiliary board.) The silver connector contains a cable that connects “upstream” (via other boards) to the IMP. The black connector contains a cable that connects “downstream” (via other boards) to the network terminator resistors. The silver connector contains a green LED that shows signalling activity going toward the IMP. The yellow LED on that connector shows signalling activity coming from the IMP.
The cables typically pass over a set of yellow LEDs labeled “Speed.” The brightness of each LED is proportional to the voltage being applied to the corresponding block. The two yellow LEDs at the end of the package are software debug LEDs.
There is one other set of connectors on the board - the track power leads. Blue wires go to the North rails and Orange wires go to the South rails
As an aid to operators, the block numbers shown on the SCab display are designated in a fashion that indicates their location. For example, block GC102 is in or near Gifford City; block FY12 is in or near the Freight Yard, etc. The block numbers shown on the display (called "dnames") are not the same as those used in the block card documentation. This has the advantage that a particular block on the layout can be moved to a different block card without changing its name on the display. However, it also means that debugging a problem with a particular block requires that you translate between the block number shown on the display and the block number used in the block card documentation.
There are three methods of doing the required translation:
Note: If you Ctrl-click on a block that is shown as a thin gray line rather than the customary white, green, red, or pink, this indicates that the block has not been implemented or that system cannot communicate with the block card for that block.
Unlike the SCab display block numbers, which are designated in a location-descriptive fashion, the switch numbers shown on the display are the same numbers that are used in the switch card documentation.
There are two methods of determining which switch card controls a particular switch:
Note: If you Ctrl-click on a switch that is shown as a gray oval rather than the customary white, this indicates that the switch has not been implemented or that system cannot communicate with the switch card for that switch.
At tmrc/sys3/server/real.lay there is a file that provides a substantial amount of information about System3.
The first section of real.lay describes the relationship between blocks and switches. As described in http://tmrc.mit.edu/sys3/scab/scabops.html, turnout switches each have three connections, numbered 0, 1, and 2. Connection 0 is the base of turnout, connection 1 is the normal route through the switch and connection 2 is the route that will be followed when the switch is operated. A crossover switch adds a fourth connection, number 3, connected to number 2 when the switch is in the normal position.

The real.lay file uses the above nomenclature to describe which blocks are connected to points 0, 1, 2, and 3 (if provided) for each switch. A typical entry in this section is:
Crossover S131
Connect 0 B194 1
Connect 1 B192 0
Connect 2 B191 0
Connect 3 B193 1
Note: In some cases where there are switches close together, there will be a short stretch of track between switches that does not have its own block, but rather is powered by another block depending on the state of the switches. Such a "block" is referred to as a "swing block" and is designated by an S-number.
Real.lay begins with a list of connections in Berkmannville:
Block B131 {
connect 0 S122 1 (The 0 end of Blk 131 connects to the 0 end of Sw 122)
connect 1 B193 0 (The 1 end of Blk 131 connects to the 0 end of Blk 193)
Block B132 {
connect 0 S122 2 (The 0 end of Block 132 connects to the 2 end of Sw 122)
connect 1 B194 0 (The 1 end of Block 132 connects to the 0 end of Blk 194)
Crossover S122 {
connect 0 B126 1 (The 0 end of Xover S122 connects to the 1 end of Blk 126)
connect 1 B131 0 (The 1 end of Xover S122 connects to the 0 end of Blk 131)
connect 2 B132 0 (The 2 end of Xover S122 connects to the 0 end of Blk 132)
connect 3 S121 1 (The 3 end of Xover S122 connects to the 1 end of Sw 121)
hand right
Switch S121 {
connect 0 B127 1 (The 0 end of Sw S121 connects to the 1 end of Blk 127)
connect 1 S122 3 (The 1 end of Sw S121 connects to the 3 end of Sw 122)
connect 2 none (There is no connection to the 2 end - presumably a siding)
hand right
The real.lay file contains similar information for Middle Heights (Middletown), Freight Yard mainline, Freight Yard, Turntable, Gifford City, P-Yard, and Staging Yard. Similar information for some of the switchcards is also included.
The next section shows which switch cards control which switches.
Typical entries are:
SwitchCard 1 {switches 0 {S33 S34 S35 S55 S36 S37 S71 S72}
input 0
}
SwitchCard 2 {
switches 0 {none S39 S51 S30 S28 S29 S31 S32}
input 0
}
SwitchCard 3 {
switches 0 {none S53 S52 S73 S25 S26 S27 S49}
signals 1 {none 5 (S28-1 0) S1 (S27 1) S1 (S27 2) S1}
input 0
The switch numbers shown are the same as the switch numbers shown on the Scab display. Note that some of the switch cards also drive wayside signals. The listing indicates the number of signal heads and where located.
The next section shows which block cards control which blocks.
Typical entries are:
BlockCard 2 {
blocks {B11 B12 B13 B21 B22 B23 none B32}
}
BlockCard 3 {
blocks {BX5 BX6 none none none none B26 B27}
}
BlockCard 4 { <P>blocks {B10 B14 B20 B31 B24 none none none}
}
BlockCard 5 {
blocks {B34 B35 B43 B44 B45 B46 none none}
This listing begins as:
Card: 0 Card Type: 1
Card: 240 Card Type 3
This is only a sample listing, is marked as a comment, and should be ignored. The file "TMRC System 3 Bus addresses" is more informative and more up to date,
The next section of real.lay is an example of the status report that is produced on the System Computer when System3 starts up. Like the "sample listing of the order of cards," this is not real-time information. However, some comments about the information shown might be useful.
For example:
Card: 0 Type: 1 (imp) Uptime: 0 seconds Reset: 0
Card: 245 Type: 3 (protocab) Uptime: 0 seconds Reset: 4 Overflows: 0 Overtime: 0
Card: 8 Type: 2 (block) Uptime: 443 seconds Reset: 4 Overflows: 0 Overtime: 0
Uptime is measured from is a four-byte quantity that measures the time since the last reset in 60th of seconds. The values shown is not particularly important for debugging purposes. Rather, what is important is the fact that the number changes.
Reset - The kind of reset the card last had (power on, brownout, etc.
Overflows - Whether the receiver serial port has had any overflows.
Overtime - Whether we took too long going around the software loop.
The final section of real.lay is a list that translates block numbers from the block cards into display names (dnames). Typical entries are:
B10 BGC109
B11 BGC107
B12 BGC106
Thus, block card blocks B10, B11, and B12 correspond to display blocks GC109, GC107, and GC106 respectively. As their prefix indicates, they are all in Gifford City.
(Telling System3 which train you want to run and which cab (control box) you want to use.)
At the SCab display, click on the block containing the train that you want to run. A dialog box will appear. The dialog box includes a list of hardware cabs that are available, i.e. plugged in and not yet in use by some other operator. Choose a cab by clicking on the small box next to the desired cab number.
In the 105th Street area, the Freight Yard (East and West), Middle Heights, and Berkmanville (East and West), the switch layouts are sufficiently complex that an entrance-exit (NX) control system is used. It is basically a case of "I'm here and I want to go there." Each of the aforementioned locations contains a card with a diagram of the switching area and a switching area identifying area code, such as #19.
By entering the area code, the operator is now ready to select a number from the left side of the drawing followed by a number on the right side of the drawing. The control system will then set up a route between those two points. For example, the diagram for the 105th Street area is shown below:
- * = Reverse
- 07 = drop block behind
- 09 = steal block ahead (traditionally called "call on")
- # = prefix for selecting another switching area
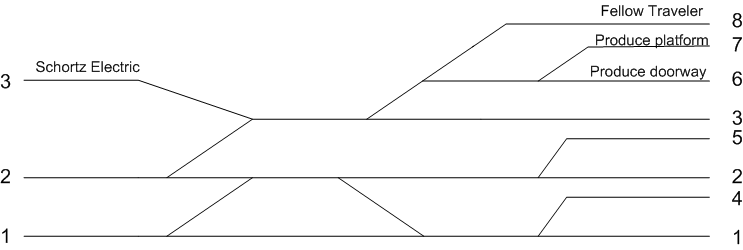
Entering 1 then 2 will set up a route from the point marked 1 on the left to the point marked 2 on the right. The route will use the leftmost crossover. Entering 1 then 4 will set up a route between the same two points, but the route will use the rightmost crossover.
When progressing from one of the switching areas discussed in the preceding section to another, enter #99, as that is the code for non-area switching. The following hardware cab commands are available: (New ones are shown in italics).
- * = Reverse
- 1-6 = throw 1st-6th facing point switch ahead. Counts from center of a block. With multi-block train, use of 7 may be required to ensure that count is done from loco block.
- 7 = drop block behind
- 8 = throw blocking switch
- 9 = steal block ahead
- # = prefix for selecting a switching area
Using a hardware cab to perform switching operations in areas other than those listed above is a bit more complex, as it becomes very important to know where the centers of the various blocks are and to know which of the cars in your train "occupy."
Consider the following case:

A train arriving from right to left, has uncoupled between cars A and B so that it can drop car A on the siding served by switch 108. If the operator enters a "1" without having reversed the locomotive, switch 100 will throw, as that is the next facing point switch ahead of the train. The more interesting possibilities are summarized in the following tables:
| Operator pressed a "7" (drop behind) before reversing | Car B and/or C occupies | Neither B nor C occupies |
| Track between 100 and 108 is a separate block from track between 108 and 127 | Pressing 1 throws 108 | Pressing 1 throws 108 |
| If the tracks between 100 and 108 and between 108 and 127 are all one block, "7" has no effect, as there is no "behind." | Pressing 1 throws 108 | Pressing 1 throws 108 |
| Operator reverses without pressing "7" | Car B and/or C occupies | Neither B nor C occupies |
| Track between 100 and 108 is a separate block from track between 108 and 127 | Pressing 1 throws 127 | Pressing 1 throws 108 |
| Tracks between 100 and 108 and between 108 and 127 are all one block, with the block center between 100 and 108. | Pressing 1 throws 108 | Pressing 1 throws 108 |
After dropping the car on the siding, reversing to pull out of the siding, and passing over switch 108, the operator can reverse one more time, enter a "1" to re-line switch 108 for the main, and proceed to pickup cars B and C. It will probably be necessary to enter a "9" (steal block ahead) to move forward into the block containing cars B and C.
Had the train upon its original arrival found switch 108 thrown against it, the operator could have entered an "8" (throw blocking switch) to throw switch 108 into the desired position.
|
Tech Model Railroad Club of
MIT Room N52-118 265 Massachusetts Avenue Cambridge, MA 02139
|
+1 617 253-3269 Email: tmrc-web@mit.edu |